Thursday, October 29, 2009

Purple Carrots & Fairy Smoke part 2

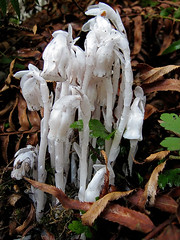
Monotropa unifloraImage by pfly via Flickr
This is part two of my posts about the inspiration behind the title of this blog; the first was a plant I liked to eat, the second, well, it's also a plant, one with an awesome name, an incredible look and an even more intriguing life story. (What can I say, I
 love plants.)
 
Fairy smoke, Indian Pipe and Ghost plant are just a few of the name by which Monotropa uniflora is known. Although it does not have chlorophyll, the photosynthetic pigment that give plants their green colour, M. uniflora is a plant and not a mushroom. It's in Ericaceae family, cousin to the the well known and loved cranberry and blueberry. It's a parasite. Instead of getting it's energy from the sun an making it's own food, it attaches itself to certain mycorrhizal fungi (mushrooms that have a symbotic relationship with plants, in this case, generally trees) and steals their food. This allows the plant to grow in the dark understory of dense and humid forests.

This plant is incredible. I've seen them in Quebec and now in Virginia Beach. They are widespread in forests across North America except in the very cold and arid areas. I've mostly seen them close to with beech trees at the end of summer and autumn which makes sense since these are the best times for mushrooms to grow. 

Keep an eye out for these eerie beauties next time you find yourself in the forest, but contrarily to its juicy cousins, they are not edible so just look, don't bite.


Take care!
Reblog this post [with Zemanta]

Purple Carrots & Fairy Smoke

Considering this blog has been around for a week now, I thought it would be a good time to explain the seemingly random title. Although it may appear otherwise, I actually put some thought into it. After the initial disappointment of discovering that Inquisitive Mind had already been used multiple times, I picked myself up and with the help of my video game absorbed husband, opted to use two of my favorite things: Purple Carrots & Fairy Smoke. (I never said the thought process was a long one.)


Purple Carrots or Purple haze is a variety of carrot that is both esthetically pleasing and enjoyable to eat. I discovered them while working as a camp counselor for the Youth Gardens (or Jardins Jeunes) program of the Montreal Botanical Gardens. This amazing program teaches kids from the age of 6 to 15 how to grow their own food by giving them a piece of land and organic vegetables. Not to mention brilliant counsellors and a loads of vegetables for only 15$/summer. One of the vegetables they grow is purple carrots. They're a hit with the kids (and everybody else I might add). You can't find them everywhere, I had never seen them in a store before until I read a post by Supayana who found them in a Montreal store. I got really excited.

These carrots have a beautiful purple exterior that extends to the core which is orange, this coloration makes them a beautiful addition to any meal. I find them slightly sweeter and softer than the traditional orange variety making them my absolute favorite snack. These carrots may be news to me but they have been cultivated in Afghanistan and other eastern countries for hundreds if not thousands of years. This is me, just spreading the love. Have you eaten purple carrots? Let me know what you think and I'd love to try any cool purple recipes you've discovered.

Take care!

Wednesday, October 28, 2009

Horseshoe Crab


Atlantic Horseshoe Crab
Limulus polyphemus


      For the past couple months, hubby and I have been living it up on Beachstreet U.S.A,Virginia Beach - consider it an extended honeymoon courtesy of the U.S. Navy.  Originally from Montreal, imagine the culture shock moving from bustling city to beach getaway. Do not weep for me, I adapted quite rapidly to this new way of life. Besides frequent visits to Oceanfront yoga (there is nothing like gazing out towards the ocean in warrior II), my favorite activity is taking a walk along the beach. If we're lucky we can see all sorts of things from pods of dolphins to flocks of pelicans not to mention crabs, clams, mites and what not. I'm ecstatic to see all these creatures that I have studied in books or out of glass jars filled with formaldehyde.

     Connecting with the David Attenborough within in, I will calmly but enthousiastically tell you all about my latest sighting, the horseshoe crab. It's a living fossil. They have been around since the Triassic and haven't changed much since then. They are more closely related to spiders than they are to crabs, even though their name indicates otherwise. My favorite word associated to this species is the telson, the scientific name for it's tail.

Physically the male and female look the same. You can tell them apart by size, the female is larger, and by looking at the end of the first leg, males have boxing glove like claspers to allow them to hold onto the female when mating. The first one I found was propably a female because of the absence of claspers. It's genitalia and gills where missing so I'm guessing they were eaten, most probably by a seagull or some other scavenger. I've been watching Bones a lot lately, it's influenced the way I look at the world. If I wasn't so squirmish about blood and death, I'd like to be a forensic scientist, determining cause of death, age and sex and what not. I'll stick to non-human or anything non-fleshy, that leaves me things with exosqueletons and plants.  Let's continue.

I found two other horseshoe crab remains a little further down the beach. From the size difference (and wishful thinking), I might have found a female and a male but neither of them had legs, well there wasn't much left of the bigger one actually, so I can't be sure. I was excited, it's the biggest one I've ever seen. I sketched my estimate of the size in the sand. They are proportional creatures, the head or prosoma is generally the same length as the abdomen or opisthosoma and the telson tail is generally the length of the body. They can grow to 60cm (24") tail included, the female being 25-30 percent bigger. The big one I found was probably over 45cm (3 times the length of my pen).

Interesting fact about horseshoe crabs, their blood is blue. Instead of having iron based blood like humans, they have copper-based blood.When the blood is oxygenated it turns blue when it's not it's colourless. Their mouth is located under their bodies between the legs, they have nine eyes and light sensitive organs along their tail.  Speaking of their tail or telson, they use it to swim but also to flip themselves over if they get stuck on their back, that's one up on the turtle.

I found someone that likes horseshoe crabs so much he got a scientific tattoo of one on his back to proove it. Check it out for yourself by clicking here.

I'll simply express my admiration by keeping a look out for horsehoe crabs along the beach and maybe, just maybe, if I'm lucky, I'll get to see a live one. Fingers crossed.

Take care!

Tuesday, October 27, 2009

Fall Colours


Autumn-Drive
     There is nothing quite like a tranquil walk through the forest on a crisp autumn day, but do not be fooled by this seemingly peaceful landscape; the forest and it's inhabitants are busy readying themselves for the harsh winter to come. Squirrels and resident birds are feverishly stashing cones and seeds, flocks or migrants are flying over head towards their distant wintering grounds and even the trees, behind their towering silence, are diligently preparing themselves for their winter slumber.

     The beautiful greens that served the trees so well over the summer months capturing light to produce nourishing sugars and release oxygen, are slowly being degraded as day length shortens and temperature drops, revealing other hidden pigments. Carotenes and xanthophylls replace the dying chlorophyll with brilliant bursts of oranges and yellows. Anthocyanins preciously stored away in the vacuoles of the lead cells can finally display their fiery reds.

      While the leaves are busy putting on a flamboyant show, the tree is slowly producing a layer of celles at the base of the leaf petiole. Once the layer is complete, the leaf will dance upon the wind for a moment before returning to the ground from which it came, leaving as only proof, a slight scar upon the branch from which it grew.

       The tree had no other choice than to release its beautiful fall foliage as the hardship of northern winters do not allow them to keep such delicate structures. The snow would weigh down on the leaves until they are torn off or the branches collapse under their combined weight. Instead, the tree has stored energy in small buds that shall open up to full green splendour when the warm temperatures return. All broad-leaved trees in northern regions shed their leaves in fall. Some may keep their leaves longer, like the majestic oak whose brown leaves may persist well into the winter and even until next growth. In warmer climates, even broad-leaved trees can be evergreen, as they do not suffer from such cruel seasonal changes.

    A dedicated observer will have no doubt noticed that not all trees shed their green leaves and that time has shaped these photosynthetic structures into resistant needles that persist throughout the winter: they are evergreens, conifer trees. Their strategy is different; by keeping their leaves, they can profit from the sun's bountiful presence for a longer period of time before the bitter cold stops photosynthetic activity.

    When all that is left are naked branches stretching out as if to tickle the clouds, urging them to release their snowy blanket, the seasoned walker smiles knowingly amongst the silent trees and chirping chickadees; this is not the end, this is but an interlude of rest before the frenzy of spring. Soon this barren brown land shall turn a sparkling white and a whole new world will be waiting to be explored.


Written about a typical autumn day in Montreal, an attempt at lyrical science, posted out of nostalgia.
Take care!
 
Reblog this post [with Zemanta]

Sunday, October 25, 2009

Yellow Garden Spider


Yellow Garden Spider

My friend and I spotted this beautiful spider in the First Landing National park of Virginia Beach. Although the scale is not apparent on this picture, the body (cephalothorax and abdomen only) was between 1.5 to 2". It was huge! It built it's enormous web (about 2 feet) among the tall grasses of the marsh. It hung there, in the middle, gently swaying in the wind. We watched it for a while amazed by the size and the brilliance of the colour pattern before continuing on our way. We came back a couple days later and it was still there.


Yellow garden spider, Argiope aurantia in an o...Image via Wikipedia
After some research, I determined that our spider was a female mainly because of it's size and the time of year. According to the University of Arkansas Arthropod museum, males rarely reach a 1/4" and stop building webs once they've reached maturity, allocating their time to finding a mate. Astonishingly, the female eats her web and builds a new one everyday, generally at the same spot. I thought it would take her much longer to build such a colossal web that she wouldn't want to waste the energy on rebuilding it. This is a common practice amongst web spinning spiders; they regain some protein and ensure that the web is always sticky. I learn something everyday. Garden Spiders make spiral orb webs with special non-sticky or noncapture parts called stabilimentum, plural is stabilimenta. (The white zigzaging thread in the picture.) They are highly visible, some say it's to prevent birds from flying through, destroying the webs, or to help with camouflage. It has been shown to reduce capture rates.  You can't see any on my picture so that could mean that this particular spider was hungry and chose to increase it's chances to catch it's dinner.

Speaking of dinner, you can watch this intense video of a Garden Spider dominating a velvet ant. Click Here. The shear wrapping speed is mind boggling never mind that the velvet ant, wingless female of the Mutillidae family, possess a hard core stinger that gave it the facetious nickname cow killer. I tip my hat to you beautiful Garden Spider, live long and prosper.

On that note, if you live in the east coast of North America, keep a look out for this amazing being in your neighborhood.


Reblog this post [with Zemanta]

Friday, October 23, 2009

Lounging around Tank top

After writing all about the dress form I just made, I felt compelled to share my latest creation or to be exact, alteration. It all began with another trip to the local thrift store. I found this funky 80s-tastic pink streaked T-shirt with the most adorable pink fish on the right shoulder blade. I had to give it a new life.

After sitting in my project box for many weeks, I came up with this cute and comfy tank top. Here's my preliminary sketch I made and then based my alterations on. The dotted lines indicate where I cut the T-shirt.


This design is a blend of my two favorite tops. I love the curved bottom because it conceals your bum, perfect for leggings and yoga pants. The wide straps and deep neckline allow for total comfort.


This project took me only 15 minutes since it requires no sewing. If you want to make one for yourself, all you need is :
  • 1 Fitted T-shirt
  • Scissors
  • Marking pen
  • Tape measure (to help keep everything even)
Follow my sketch or design your own. Have fun!

Look at the little fish swimming across my back! ------------------------------------------------------------------------>


My next project is a stylish racer back tank top. Hope this inspires you to look through your closet and give a second life to your clothes.

Take care!

Thursday, October 22, 2009

Duct tape Dressmaker's Dummy

Pink Duck Tape Rose
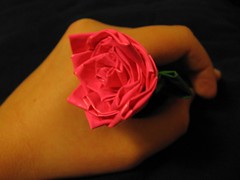
I must confess, I love working with duct tape. I believe you can fix almost everything with a bit of this sticky miracle. It's a wonderful product, water resistant, very sticky, easy to tear but also very strong. I recently watched the Mythbuster team use duct tape to build a potato launcher, a canon, a sail boat and even suspend a car in midair. If you have 5 minutes, type up Duct tape Costumes in Google or click here to see amazing works of duct tape art. I posted a picture of a beautiful duct tape rose to give you an idea. Goes to show, I'm not the only person crazy about duct tape. Imagine my excitement when I discovered my next project. 

In addition to playing with duck tape, I also enjoy making my own clothes.  However, this process required many trips to and from the mirror or asking my relatively uninterested but supportive husband to place pins dangerously close to my body. I concluded that to make the necessary tweaks and tucks to my creations easier and painless, I needed a dressmaker's dummy or dress form. So I dragged my dear hubby to the four corners of the city on a crazy goose hunt, all in vain. I could never find one that fit my budget and my shape. Discouraged, I was taken to a book store - they always cheer me up. As I browsed away my sorrow, I stumbled across the Stitch Lounge Girls' Subversive Seamster. A wonderful book that teaches you to" transform thrift store threads into street couture" and to make your own duct tape dress form. BINGO! My joie de vivre completly restored, we raced off in search of the materials. At this point, I was still unaware of the wide assortment of colours available, so my happiness grew 10 fold when I found I could purchase my favorite colour.

Here's the list of material you need to make your own perfectly shaped dress form:
  • 1 Close fitting T-shirt
  • 4 Rolls of duct tape
  • Plastic wrap or extra material (plastic shopping bags will do)
  • Scissors
  • 1 Willing and patient friend
  • 2.5-3 hrs to spare
  • A good movie or back to back to back episodes of your favorite show
  • Stuffing material
  • Stand (standing lamp base, microphone stand, artificial tree pot and broom stick)
The book offers descriptive steps and helpful illustrations.  I made some modifications to the technique so here is how I broke it down.

Step 1 : Preparation
Go to the bathroom, you're in this for at least 2hrs. Make sure the room you are in is at a comfortable temperature, tie your hair up and out of the way, then strip down to your underwear and put on the selected T-shirt. (Note: you will never see this t-shirt again.) The sleeves of the t-shirt should cover a little more than half your bicep and the bottom should reach mid-thigh. Supplement any missing length with either plastic rap or extra material. From this point forward, try and stay as still as you can as your friend wraps you. I suggest keeping your feet two fists apart which will help you with your balance.


Step 2 :  Begin wrapping
Place strips horizontally starting from the bottom and working your way up to the bra-line. Be careful to overlap each strip and I suggest using strips no longer than your forearm.

Step 3 : Bust
In order to accurately represent your bust size, use short strips and arrange them in a flower-like pattern on each breast - each strip being one petal. Make sure each strip is long enough to extend from the nipple to the contour of the breast. Once this is done, crisscross two strips of duct tape, one from each shoulder ending at the waist and crossing in the middle of your chest. Then make vertical shoulder straps from where you ended the flower covering the region between the neckline to the sleeve seam. Don't forget to cover the back entirely, you can use smaller vertical strips to connect the shoulders to the horizontal wrapping.

Step 4 : Arms and neck

Hold your arms at a 45-degree angle to make sure that, in due time, you can fit garments underneath. Begging where your bra strap would be and extend the strip vertically down your arm until about one inch above the mid-bicep line. Continue all around to make the sleeves. Add a second layer of duck tape horizontally this time. Once both arms are done, create a duct tape turtleneck by taping horizontal strips until you are a couple inches high making sure to avoid stray hairs. 

Step 5 : Finishing touches
Don't despair you're almost done. Using long vertical strips, add a second coat from the bra-line to the bottom, making them as smooth as possible. Ask your friend to step back from their work of art and give it a once-over and cover any remaining t-shirt spots. At this time, mark the location of your belly button and any other liked or disliked markings on dress form. This will help you when you're creating your new fashion collection.

Step 6 : Extraction
With a pair of scissors, not your best sewing scissors though, have your friend carefully cut up the center of your back, along the spine, expertly avoiding skin and underwear. Remove yourself slowly from your double, put your clothes back on and sit down. I felt like I had lost some bones in the process and had to curl up into child pose to recover. Wimp, maybe, but a wimp with her own perfectly adjusted dress form.

Step 7 : Stuffing
Close up the seam with duct tape and stuff your dummy. The authors of the Subversive Seamster suggest using batting but I went with a mix of torn up newspapers and packing peanuts I had around the house and it worked just fine. Close up neck and arm holes with more duct tape flowers. Before closing up the bottom, insert your stand, measure the height from your belly button to the floor and use that measure to secure the dummy at the right height using the marked belly button as a reference point. Thank your friend profusely and if it is their desire, help them make their own.

The book then goes on to show you cool ways of transforming thrift store finds into trendy clothes. My favorite is the bat wing top made from a sheet and an elastic belt. If you are interested in modifying clothes, I strongly suggest that you purchase the Subversive Seamster. I strongly suggest Amazon since you can find it for 4$ less than in bookstores.  Let me know how it works out and feel free to send me pictures of your creations (emilieDwolf{at}gmail{dot}com).


Take care!


Reblog this post [with Zemanta]

Tuesday, October 20, 2009

Let's get started

We live in a very interesting place, all around us whether we acknowledge it or not things are happening. Each and everyone of us has a different view of the world; this blog will let you see the world through my eyes.

I graduated this year and proudly set off into the real world with my Bachelors degree in hand and all the knowledge a major in Wildlife Biology can provide. With this background, I will look at various aspects of the green movement, fashion, arts and crafts and whatever else happens to tickle my fancy.


Let's start off with my latest project: homemade toothpaste.

Crest MultiCare Whitening toothpasteImage via Wikipedia
Although very random, this idea came to me after flipping through Starre Vartan's The Eco Chick Guide to Life: How to Be Fabulously Green. In her book, Vartan points out that toothpaste contains trace amounts of chemicals which are toxic when ingested - hence the warning signs on the back of the tube - and ingredients such as triclosan (a registered pesticide), potassium nitrate, parabens, and potassium nitrate which are recognized to have a negative impact on aquatic ecosystems. Vartan also commented on the pollution generated by the tubes and packaging.
For the sake of the planet, which I hold very dear, and the simple satisfaction of my inquisitive mind, I ran to the nearest pharmacy to get what I needed.
  • 3 drops Organic peppermint oil
  • 3 tbs Baking Soda
  • 1 tbs Salt
  • 3 tsp Glycerin
Mix this all together and store in a covered container to keep it from drying out and there you have it, your very own eco-friendly toothpaste.

I've been using it for a couple of days now and apart from the baking soda taste, it's quite pleasant and I have had no complaints about bad breath. However, after doing a little more research, it turns out baking soda also has a negative environmental impact and cinnamon oil (another suggested flavour) may cause plasma cell gingivitis.

There are organic alternatives available but they are more expensive and still contribute to filling our landfills. So, even though homemade toothpaste is not completely eco-friendly, it's the best thing yet, not to mention it being inexpensive, easy and fun to make.

If you want to read about more eco-friendly steps you can take, you can buy the book. The cheapest place I have found is amazon.


Take care!

You might also like

Related Posts with Thumbnails